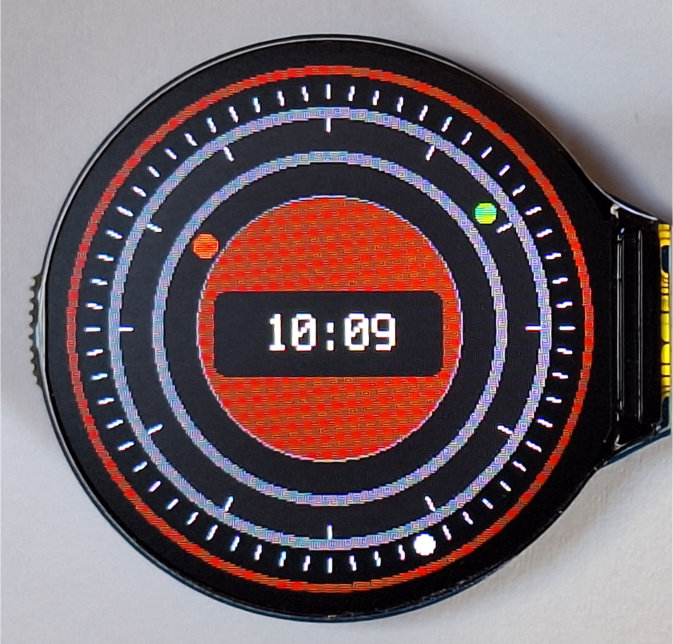
Magic-Watch auf dem RP 2040
Weiter unten wird auf dem runden Display WS-28986 (RP 2350)
eine etwas aufwendigere Uhr 'Magic-Watch' realisiert und zum Download angeboten.
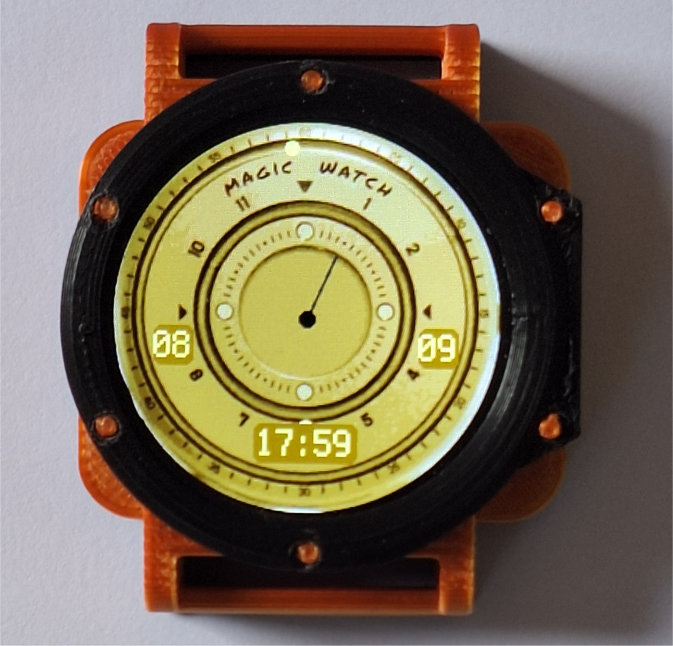
Magic-Watch auf dem RP 2350
Hardware
- Rundes 1,28-Zoll-IPS-LCD-Display RP 2040 oder
- Rundes 1,28-Zoll-IPS-LCD-Display RP 2350
- USB-A zu USB-C Kabel
Magic-Watch auf dem RP 2040
Magic-Watch auf dem RP 2350
Nachdem wir den mathematischen Teil hinter uns haben, realisieren wir in dieser Folge eine Uhrfunktion auf dem runden Display. Dabei nutzen wir aus der zweiten Folge die
Darstellung von Kreisen für die Hintergrundgestaltung und drei sich im Kreis bewegende Punkte für die Darstellung der Sekunden, Minuten und
Stunden. In der Mitte werden die Stunden und Minuten digital angezeigt.
Los gehts mit dem RP 2040
(Verwenden Sie als Bibliotheken im 'lib-Ordner' wieder die selben, wie in der Anleitung 'verbesserte Analoguhr'
hier .)
Kopieren Sie den Code aus dem unteren Kasten ins Thonny und schauen sich die hinzugekommenen Teile an. Zunächst wird in Zeile 15 das Modul zum Zeichnen
von Linien importiert. (Bei Ihnen ist evtl. ganz oben eine Leerzeile, die Sie löschen). Damit stellen wir kurze Striche zur Veranschaulichung der Minuten und Stunden dar. Dies geschieht in den Zeilen
43 bis 58. Dazwischen ordnen wir silberfarbene Ringe an. Wenn Sie das Programm starten, können Sie den Displayaufbau gut beobachten. Die Ausgabe des freien Speichers im
Terminal zeigt, dass gar nicht mehr viel übrig ist. In Zeile 79 steht jetzt 'time.sleep(1)'. Damit wird vorläufig der Sekundentakt
erzeugt, während der kleine weisse Punkt im äußeren Ring läuft.
1   # SPDX-FileCopyrightText: 2023 Detlef Gebhardt, written for CircuitPython
2   # SPDX-FileCopyrightText: Copyright (c) 2023 Detlef Gebhardt
3   #
4   # SPDX-License-Identifier: GEBMEDIA
5   import time
6   import gc
7   import board
8   import busio
9   from busio import I2C
10  import displayio
11  import terminalio
12  import gc9a01
13  from adafruit_display_text import label
14  from adafruit_display_shapes.circle import Circle
15  from adafruit_display_shapes.line import Line
16  import random
17  import math
18  import fourwire
19  # Release any resources currently in use for the displays
20  displayio.release_displays()
21
22  # Make the displayio SPI bus and the GC9A01 display
23  spi = busio.SPI(clock=board.GP10, MOSI=board.GP11)
24  display_bus = fourwire.FourWire(spi, command=board.GP8, chip_select=board.GP9, reset=board.GP12)
25  display = gc9a01.GC9A01(display_bus, width=240, height=240, rotation=90, backlight_pin=board.GP25)
26
27  # Make the display context
28  group1 = displayio.Group()
29  display.root_group = group1
30
31  width = 240
32  height = 240
33  xpos = 120
34  ypos = 120
35  radius = 120
36  i = 0
37
38  # Make some circles and lines:
39  circle = Circle(xpos, ypos, 120, fill=0xae2323, outline=0x000000)
40  group1.append(circle)
41  circle = Circle(xpos, ypos, 115, fill=0x000000, outline=0x000000)
42  group1.append(circle)
43  # Sekundenstriche
44  for i in range(60):
45      line = Line(xpos+int(105*math.cos(i*math.pi/30)),ypos-int(105*math.sin(i*math.pi/30)),
46                  xpos+int(110*math.cos(i*math.pi/30)), ypos-int(110*math.sin(i*math.pi/30)),0xffffff)
47      group1.append(line)
48      display.root_group = group1
49  # Stundenstriche
50  for i in range(12):
51      line = Line(xpos+int(65*math.cos(i*math.pi/6)),ypos-int(65*math.sin(i*math.pi/6)),
52                  xpos+int(60*math.cos(i*math.pi/6)), ypos-int(60*math.sin(i*math.pi/6)),0xffffff)
53      group1.append(line)
54      display.root_group = group1
55
56  circle_sec = Circle(xpos, ypos, 5, fill=0xffffff, outline=0xffffff)
57  group1.append(circle_sec)
58
59  while True:
60      for i in range (60):
61          xpos_neu = int(width/2 + 108*math.cos((i -15)*math.pi/30))
62          delta_x = xpos_neu - xpos
63          xpos = xpos_neu
64          ypos_neu = int(height/2 + 108*math.sin((i -15)*math.pi/30))
65          delta_y = ypos_neu - ypos
66          ypos = ypos_neu
67          circle_sec.x = circle_sec.x + delta_x
68          circle_sec.y = circle_sec.y + delta_y
69          time.sleep(1)
70          gc.collect()
71          print(gc.mem_free())
72
Im nächsten Schritt brauchen wir eine Uhrzeit. Dazu nutzen wir, solange die Uhr am PC angeschlossen ist time.localtime() und definieren hour, minute, second als Variable für die Stunden, Minuten und Sekunden. Diese Ergänzungen finden Sie im unteren Kasten ab Zeile 59. In den Zeilen 63 bis 68 werden noch die Minuten- und Stundenpunkte festgelegt. Die 'while'-Schleife beginnt jetzt in Zeile 70. Kopieren Sie den Code und dann sehen wir uns die Veränderungen in der Schleife an.
1   # SPDX-FileCopyrightText: 2023 Detlef Gebhardt, written for CircuitPython
2   # SPDX-FileCopyrightText: Copyright (c) 2023 Detlef Gebhardt
3   #
4   # SPDX-License-Identifier: GEBMEDIA
5   import time
6   import gc
7   import board
8   import busio
9   from busio import I2C
10  import displayio
11  import terminalio
12  import gc9a01
13  from adafruit_display_text import label
14  from adafruit_display_shapes.circle import Circle
15  from adafruit_display_shapes.line import Line
16  import random
17  import math
18  import fourwire
19  # Release any resources currently in use for the displays
20  displayio.release_displays()
21
22  # Make the displayio SPI bus and the GC9A01 display
23  spi = busio.SPI(clock=board.GP10, MOSI=board.GP11)
24  display_bus = fourwire.FourWire(spi, command=board.GP8, chip_select=board.GP9, reset=board.GP12)
25  display = gc9a01.GC9A01(display_bus, width=240, height=240, rotation=90, backlight_pin=board.GP25)
26
27  # Make the display context
28  group1 = displayio.Group()
29  display.root_group = group1
30
31  width = 240
32  height = 240
33  xpos = 120
34  ypos = 120
35  radius = 120
36  i = 0
37
38  # Make some circles and lines:
39  circle = Circle(xpos, ypos, 120, fill=0xae2323, outline=0x000000)
40  group1.append(circle)
41  circle = Circle(xpos, ypos, 115, fill=0x000000, outline=0x000000)
42  group1.append(circle)
43  # Sekundenstriche
44  for i in range(60):
45      line = Line(xpos+int(105*math.cos(i*math.pi/30)),ypos-int(105*math.sin(i*math.pi/30)),
46                  xpos+int(110*math.cos(i*math.pi/30)), ypos-int(110*math.sin(i*math.pi/30)),0xffffff)
47      group1.append(line)
48      display.root_group = group1
49  # Stundenstriche
50  for i in range(12):
51      line = Line(xpos+int(65*math.cos(i*math.pi/6)),ypos-int(65*math.sin(i*math.pi/6)),
52                  xpos+int(60*math.cos(i*math.pi/6)), ypos-int(60*math.sin(i*math.pi/6)),0xffffff)
53      group1.append(line)
54      display.root_group = group1
55
56  circle_sec = Circle(xpos, ypos, 4, fill=0xffffff, outline=0xffffff)
57  group1.append(circle_sec)
58
59  xpos_min = 120
60  ypos_min = 33
61  xpos_hour = 120
62  ypos_hour = 52
63  # Minutenpunkt in grün
64  circle_min = Circle(xpos_min,ypos_min, 5, fill=0x00cc00, outline=0x000000)
65  group1.append(circle_min)
66  # Stundenpunkt in rot
67  circle_hour = Circle(xpos_hour, ypos_hour, 5, fill=0xff0000, outline=0xff0000)
68  group1.append(circle_hour)
69
70  while True:
71      current_time = time.localtime()
72      hour = current_time[3]
73      minute = current_time[4]
74      second = current_time[5]
75      # minute setzen
76      xpos_min_neu = int(width/2 + 88*math.cos((minute-15)*math.pi/30))
77      delta_min_x = xpos_min_neu - xpos_min
78      xpos_min = xpos_min_neu
79      ypos_min_neu = int(height/2 + 88*math.sin((minute-15)*math.pi/30))
80      delta_min_y = ypos_min_neu - ypos_min
81      ypos_min = ypos_min_neu
82      circle_min.x = circle_min.x + delta_min_x
83      circle_min.y = circle_min.y + delta_min_y
84      gc.collect()
85      # hour
86      xpos_hour_neu = int(width/2 + int(38*math.cos((hour)*math.pi/6 + minute/2*math.pi/180 - math.pi/2)))
87      delta_hour_x = xpos_hour_neu - xpos_hour
88      xpos_hour = xpos_hour_neu
89      ypos_hour_neu = int(height/2 + int(38*math.sin((hour)*math.pi/6 + minute/2*math.pi/180 - math.pi/2)))
90      delta_hour_y = ypos_hour_neu - ypos_hour
91      ypos_hour = ypos_hour_neu
92      circle_hour.x = circle_hour.x + delta_hour_x
93      circle_hour.y = circle_hour.y + delta_hour_y
94      for i in range (60):
95          second *= 1
96          xpos_neu = int(width/2 + 108*math.cos((i -15)*math.pi/30))
97          delta_x = xpos_neu - xpos
98          xpos = xpos_neu
99          ypos_neu = int(height/2 + 108*math.sin((i -15)*math.pi/30))
100         delta_y = ypos_neu - ypos
101         ypos = ypos_neu
102         circle_sec.x = circle_sec.x + delta_x
103         circle_sec.y = circle_sec.y + delta_y
104         time.sleep(1)
105         gc.collect()
106         print(gc.mem_free())
Mathematisch kommt es jetzt auf die exakte Berechnung der Positionen der Minuten- und Stundenpunkte an.
Minuten: Da eine Stunde 60 Minuten hat und der Zeiger dabei 360 Grad zurücklegt, entspricht
1 Minute 360 / 60 = 6 Grad (also pi / 30). Für die Berechnung ergibt sich daraus:
xpos_min_neu = int(width/2 + 88*math.cos((minute-15)*math.pi/30))
Die 88 steht für den Radius und die -15 wegen der Displaydrehung um 90 Grad (also 15 Minuten). Analog gilt das für
die y-Position.
ypos_min_neu = int(height/2 + 88*math.sin((minute-15)*math.pi/30))
Aus diesen neuen Positionen und den alten Positionen wird die Differenz 'delta' bestimmt und in den Zeilen 82, 83 an den
Kreis übergeben. So wird der Minutenpunkt in den Zeilen 76 bis 83 aktualisiert.
Stunden: Für den Stundenpunkt ist das Ganze noch etwas aufwendiger, da sich der Stundenzeiger während
einer Stunde kontinuierlich mitbewegt. Grundsätzlich gilt: 12 Stunden sind 360 Grad. Also 360 / 12 = 30 Grad (also pi / 6).
Für die Berechnung ergibt sich daraus:
xpos_hour_neu = int(width/2 + int(38*math.cos((hour)*math.pi/6 + minute/2*math.pi/180 - math.pi/2)))
und
ypos_hour_neu = int(height/2 + int(38*math.sin((hour)*math.pi/6 + minute/2*math.pi/180 - math.pi/2)))
Die 38 steht für den Radius und die -pi/2 für die Displaydrehung. Der übrige Teil des Ausdrucks sorgt dafür, dass sich
der Stundenzeiger in Abhängikeit von den Minuten mitbewegt. So wird der Stundenpunkt von Zeile 86 bis 93 aktualisiert.
In den Zeilen 94 bis 103 wird der Sekundenpunkt wie gehabt gesetzt.
Mit ein paar Ergänzungen fügen wir dem Programm noch eine digitale Anzeige, wie auf dem Bild ganz oben, hinzu. Dazu wird ein
Rechteck mit abgerundeten Ecken 'roundrect' und ein 'label', welches die Zeit als String ausgibt, angelegt. Jetzt neu in den Zeilen
71 bis 81. Auch in der 'while'-Schleife sind die Zeilen 88 und 89 jetzt neu. Sie stellen die Uhrzeit digital auf dem Display dar.
Die nachfolgenden Zeilen verschieben sich dadurch nach hinten.
Zur besseren Übersicht gebe ich den geänderten Code noch einmal komplett zum kopieren an.
1   # SPDX-FileCopyrightText: 2023 Detlef Gebhardt, written for CircuitPython
2   # SPDX-FileCopyrightText: Copyright (c) 2023 Detlef Gebhardt
3   #
4   # SPDX-License-Identifier: GEBMEDIA
5   import time
6   import gc
7   import board
8   import busio
9   from busio import I2C
10  import displayio
11  import terminalio
12  import gc9a01
13  from adafruit_display_text import label
14  from adafruit_display_shapes.circle import Circle
15  from adafruit_display_shapes.line import Line
16  from adafruit_display_shapes.roundrect import RoundRect
17  import random
18  import math
19  import fourwire
20  # Release any resources currently in use for the displays
21  displayio.release_displays()
22
23  # Make the displayio SPI bus and the GC9A01 display
24  spi = busio.SPI(clock=board.GP10, MOSI=board.GP11)
25  display_bus = fourwire.FourWire(spi, command=board.GP8, chip_select=board.GP9, reset=board.GP12)
26  display = gc9a01.GC9A01(display_bus, width=240, height=240, rotation=90, backlight_pin=board.GP25)
27
28  # Make the display context
29  group1 = displayio.Group()
30  display.root_group = group1
31
32  width = 240
33  height = 240
34  xpos = 120
35  ypos = 120
36  radius = 120
37  i = 0
38
39  # Make some circles and lines:
40  circle = Circle(xpos, ypos, 120, fill=0xae2323, outline=0x000000)
41  group1.append(circle)
42  circle = Circle(xpos, ypos, 115, fill=0x000000, outline=0x000000)
43  group1.append(circle)
44  # Sekundenstriche
45  for i in range(60):
46      line = Line(xpos+int(105*math.cos(i*math.pi/30)),ypos-int(105*math.sin(i*math.pi/30)),
47                  xpos+int(110*math.cos(i*math.pi/30)), ypos-int(110*math.sin(i*math.pi/30)),0xffffff)
48      group1.append(line)
49      display.root_group = group1
50  # Stundenstriche
51  for i in range(12):
52      line = Line(xpos+int(65*math.cos(i*math.pi/6)),ypos-int(65*math.sin(i*math.pi/6)),
53                  xpos+int(60*math.cos(i*math.pi/6)), ypos-int(60*math.sin(i*math.pi/6)),0xffffff)
54      group1.append(line)
55      display.root_group = group1
56
57  circle_sec = Circle(xpos, ypos, 4, fill=0xffffff, outline=0xffffff)
58  group1.append(circle_sec)
59
60  xpos_min = 120
61  ypos_min = 33
62  xpos_hour = 120
63  ypos_hour = 52
64  # Minutenpunkt in grün
65  circle_min = Circle(xpos_min,ypos_min, 5, fill=0x00cc00, outline=0x000000)
66  group1.append(circle_min)
67  # Stundenpunkt in rot
68  circle_hour = Circle(xpos_hour, ypos_hour, 5, fill=0xff0000, outline=0xff0000)
69  group1.append(circle_hour)
70
71  # Rechteck mit abgerundeten Ecken
72  roundrect1 = RoundRect(85, 105, 75, 35, 10, fill=0x282323, outline=0xae2323, stroke=3)
73  group1.append(roundrect1)
74
75  ## create the time-label
76  updating_label1 = label.Label(font=terminalio.FONT, text="", scale=2, color=0xffffaa,line_spacing=1)
77  # set label position on the display and add label
78  updating_label1.anchor_point = (0, 0)
79  updating_label1.anchored_position = (92, 110)
80  group1.append(updating_label1)
81  display.root_group = group1
82
83  while True:
84      current_time = time.localtime()
85      hour = current_time[3]
86      minute = current_time[4]
87      second = current_time[5]
88      zeit = "{:02}:{:02}".format(hour,minute)
89      updating_label1.text = zeit
90      # minute setzen
91      xpos_min_neu = int(width/2 + 88*math.cos((minute-15)*math.pi/30))
92      delta_min_x = xpos_min_neu - xpos_min
93      xpos_min = xpos_min_neu
94      ypos_min_neu = int(height/2 + 88*math.sin((minute-15)*math.pi/30))
95      delta_min_y = ypos_min_neu - ypos_min
96      ypos_min = ypos_min_neu
97      circle_min.x = circle_min.x + delta_min_x
98      circle_min.y = circle_min.y + delta_min_y
99      gc.collect()
100     # hour
101     xpos_hour_neu = int(width/2 + int(38*math.cos((hour)*math.pi/6 + minute/2*math.pi/180 - math.pi/2)))
102     delta_hour_x = xpos_hour_neu - xpos_hour
103     xpos_hour = xpos_hour_neu
104     ypos_hour_neu = int(height/2 + int(38*math.sin((hour)*math.pi/6 + minute/2*math.pi/180 - math.pi/2)))
105     delta_hour_y = ypos_hour_neu - ypos_hour
106     ypos_hour = ypos_hour_neu
107     circle_hour.x = circle_hour.x + delta_hour_x
108     circle_hour.y = circle_hour.y + delta_hour_y
109     for i in range (60):
110         second *= 1
111         xpos_neu = int(width/2 + 108*math.cos((i -15)*math.pi/30))
112         delta_x = xpos_neu - xpos
113         xpos = xpos_neu
114         ypos_neu = int(height/2 + 108*math.sin((i -15)*math.pi/30))
115         delta_y = ypos_neu - ypos
116         ypos = ypos_neu
117         circle_sec.x = circle_sec.x + delta_x
118         circle_sec.y = circle_sec.y + delta_y
119         time.sleep(1)
120         gc.collect()
121         print(gc.mem_free())
Viel Spass und Erfolg beim Ausprobieren.
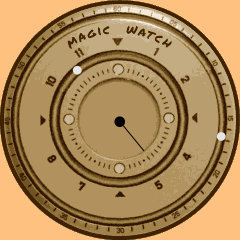
Versprochen war ja auch noch eine Version für dem RP 2350, wie im zweiten Bild von oben. Dazu wird als Zifferblatt das folgende Hintergrundbild
geladen.

Im Uhrbetrieb bewegen sich zwei Kugeln in einer äußeren und einer inneren Rinne.
Die äußere Kugel gibt die Position der Minuten an. Die innere Kugel die Stundenposition. Im Zentrum dreht sich ein kleiner
Sekundenzeiger. Die Uhrzeit 14:25 Uhr am 10.09. wird dann so angezeigt:

Legt man die Uhr aus der Hand flach auf den Tisch, werden die Anzeigen von Zeit und Datum ausgeblendet. Die Kugeln laufen jetzt gegenläufig
in den Rinnen, ohne Zeitangabe. Nach acht Sekunden wird die Displayhelligkeit reduziert, um Strom zu sparen. Nimmt man die Uhr zur Hand,
ist die Anzeige sofort wieder sichtbar.
Hier geht es
zum Download der fertigen uf2-Datei
für das Display WS-28986 (RP 2350).
Eine kurze Bedienungsanleitung, wie Sie die Uhr ohne PC stellen, finden Sie
hier.
Viel Spass und Erfolg beim Ausprobieren.